

前回Remote MCP Server のテストとしてOAuth認証なしだとテスト環境が限られるということでVSCode+Copilotを試してみました。
https://serverless.co.jp/blog/b-rab5q77fd/
また個人ブログではPostmanのテスト機能を使ってみた記事も上げています。
https://zenn.dev/kameoncloud/articles/dd0c7951cf1aae
今日は最近よく目にするMCP Inspectorを使っていきたいと思います。
MCP Inspector とは
MCP(Model Context Protocol)対応アプリケーションやMCP Serverと通信するための開発者向けデバッグツールです。具体的には、MCPクライアントとして振る舞い、Remote MCP Server(HTTP経由)や Local MCP Server(stdio経由)と通信し、プロトコルの流れを確認したり、独立してメソッドを手動で呼び出したりすることができます。
配布はこちらで行われおりローカルで起動しブラウザでアクセスを行う形態をとります。
https://github.com/modelcontextprotocol/inspector
MCP Inspector Client(MCPI) と MCP Proxy(MCPP)
MCP Inspectorは2つのコンポーネントから構成されています。
MCPI: Reactで開発されているウェブベースのUIを提供し、ブラウザからアクセスして操作します
MCPP: MCPI がMCP Serverに接続する際に使うプロトコルのブリッジ(翻訳機みたいなもの)です。MCP ServerはSTDIO,SSE,Streamable-HTTPと3つのプロトコルに対応していますが、MCPI が任意のプロトコルでMCP Serverへ接続する際に必要となります。
さっそくやってみる
Remote MCP Server の準備
準備はとても簡単です。
https://serverless.co.jp/blog/b-rab5q77fd/
こちらの記事で手順は纏めていますが以下のコードをnode remotemcp.jsとして起動するだけです。
const http = require('http');
const url = require('url');

// MCPメッセージのIDカウンター
let messageId = 1;

// レスポンスヘルパー関数
function sendJsonResponse(res, data, statusCode = 200) {
  res.writeHead(statusCode, {
    'Content-Type': 'application/json',
    'Access-Control-Allow-Origin': '*',
    'Access-Control-Allow-Methods': 'POST, GET, OPTIONS',
    'Access-Control-Allow-Headers': 'Content-Type'
  });
  res.end(JSON.stringify(data));
}

// MCPプロトコルメッセージハンドラー
function handleMCPMessage(message) {
  const { method, params } = message;

  switch (method) {
    case 'initialize':
      return {
        jsonrpc: '2.0',
        id: message.id,
        result: {
          protocolVersion: '2024-11-05',
          capabilities: {
            tools: {},
            prompts: {},
            resources: {}
          },
          serverInfo: {
            name: 'hello-world-mcp-server',
            version: '1.0.0'
          }
        }
      };

    case 'notifications/initialized':
      // initialized通知には応答不要
      return null;

    case 'tools/list':
      return {
        jsonrpc: '2.0',
        id: message.id,
        result: {
          tools: [
            {
              name: 'hello_world',
              description: 'Returns a simple hello world message',
              inputSchema: {
                type: 'object',
                properties: {
                  name: {
                    type: 'string',
                    description: 'Name to greet (optional)'
                  }
                }
              }
            }
          ]
        }
      };

    case 'tools/call':
      const { name: toolName, arguments: args } = params;

      if (toolName === 'hello_world') {
        const name = args?.name || 'World';
        return {
          jsonrpc: '2.0',
          id: message.id,
          result: {
            content: [
              {
                type: 'text',
                text: `Hello, ${name}! This is a simple MCP server response.`
              }
            ]
          }
        };
      }

      // 未知のツール
      return {
        jsonrpc: '2.0',
        id: message.id,
        error: {
          code: -32601,
          message: `Unknown tool: ${toolName}`
        }
      };

    default:
      return {
        jsonrpc: '2.0',
        id: message.id,
        error: {
          //code: -32601,
          //message: `Method not found: ${method}`
        }
      };
  }
}

// HTTPサーバー作成
const server = http.createServer((req, res) => {
  const parsedUrl = url.parse(req.url, true);

  // CORS preflight
  if (req.method === 'OPTIONS') {
    sendJsonResponse(res, {});
    return;
  }

  // GET - サーバー情報
  if (req.method === 'GET' && parsedUrl.pathname === '/') {
    sendJsonResponse(res, {
      name: 'Hello World MCP Server',
      version: '1.0.0',
      description: 'A simple MCP server that responds with hello world messages',
      endpoints: {
        mcp: '/mcp'
      }
    });
    return;
  }

  // POST - MCPメッセージ処理
  if (req.method === 'POST' && parsedUrl.pathname === '/mcp') {
    let body = '';

    req.on('data', chunk => {
      body += chunk.toString();
    });

    req.on('end', () => {
      try {
        const message = JSON.parse(body);
        console.log('Received MCP message:', JSON.stringify(message, null, 2));

        const response = handleMCPMessage(message);

        if (response) {
          console.log('Sending response:', JSON.stringify(response, null, 2));
          sendJsonResponse(res, response);
        } else {
          // notifications/initializedなど、応答不要の場合
          res.writeHead(204);
          res.end();
        }
      } catch (error) {
        console.error('Error processing message:', error);
        sendJsonResponse(res, {
          jsonrpc: '2.0',
          id: null,
          error: {
            code: -32700,
            message: 'Parse error'
          }
        }, 400);
      }
    });
    return;
  }

  // 404
  sendJsonResponse(res, { error: 'Not found' }, 404);
});

const PORT = process.env.PORT || 3000;

server.listen(PORT, () => {
  console.log(`MCP HTTP Server running on port ${PORT}`);
  console.log(`Server info: http://localhost:${PORT}/`);
  console.log(`MCP endpoint: http://localhost:${PORT}/mcp`);
});

// グレースフルシャットダウン
process.on('SIGINT', () => {
  console.log('\nShutting down server...');
  server.close(() => {
    console.log('Server closed');
    process.exit(0);
  });
});
MCP HTTP Server running on port 3000
Server info: http://localhost:3000/
MCP endpoint: http://localhost:3000/mcpMCP Inspector のインストールと起動
上記でMCP Serverを起動したターミナルは待ち状態となるため別のターミナルを開きディレクトリを作成してから移動します。
mkdir mcpinspector
cd mcpinspector
以下のコマンドでMCP Inspectorをインストールし起動します。
npx @modelcontextprotocol/inspectorStarting MCP inspector...
⚙️ Proxy server listening on 127.0.0.1:6277
🔑 Session token: f73e9895ce4738df37ce4b340f798ad32511533e56b5b0846800c579aac39986
Use this token to authenticate requests or set DANGEROUSLY_OMIT_AUTH=true to disable auth
🔗 Open inspector with token pre-filled:
http://localhost:6274/?MCP_PROXY_AUTH_TOKEN=f73e9895ce4738df37ce4b340f798ad32511533e56b5b0846800c579aac39986
🔍 MCP Inspector is up and running at http://127.0.0.1:6274 一つ注意点があります。本来MCP ServerにおけるOAuth認証はオプションとなっていますが、Remote型はエンドポイントがインターネットに露出するため、いくつかのMCP ClientではRemote MCP Serverの接続にはOAuthの認証を必須としています。
MCP InspectorではOAuth未実装のMCP Serverにも接続は可能なのですが、その場合DANGEROUSLY_OMIT_AUTHオプションを有効化させるか、一時的に払い出されるセッショントークンを用いる必要があります。昔のバージョンにはなかった仕様なのではまりポイントです。
上記の例でいえばブラウザでアクセスすべきはhttp://localhost:6274/?MCP_PROXY_AUTH_TOKEN=f73e9895ce4738df37ce4b340f798ad32511533e56b5b0846800c579aac39986になります。
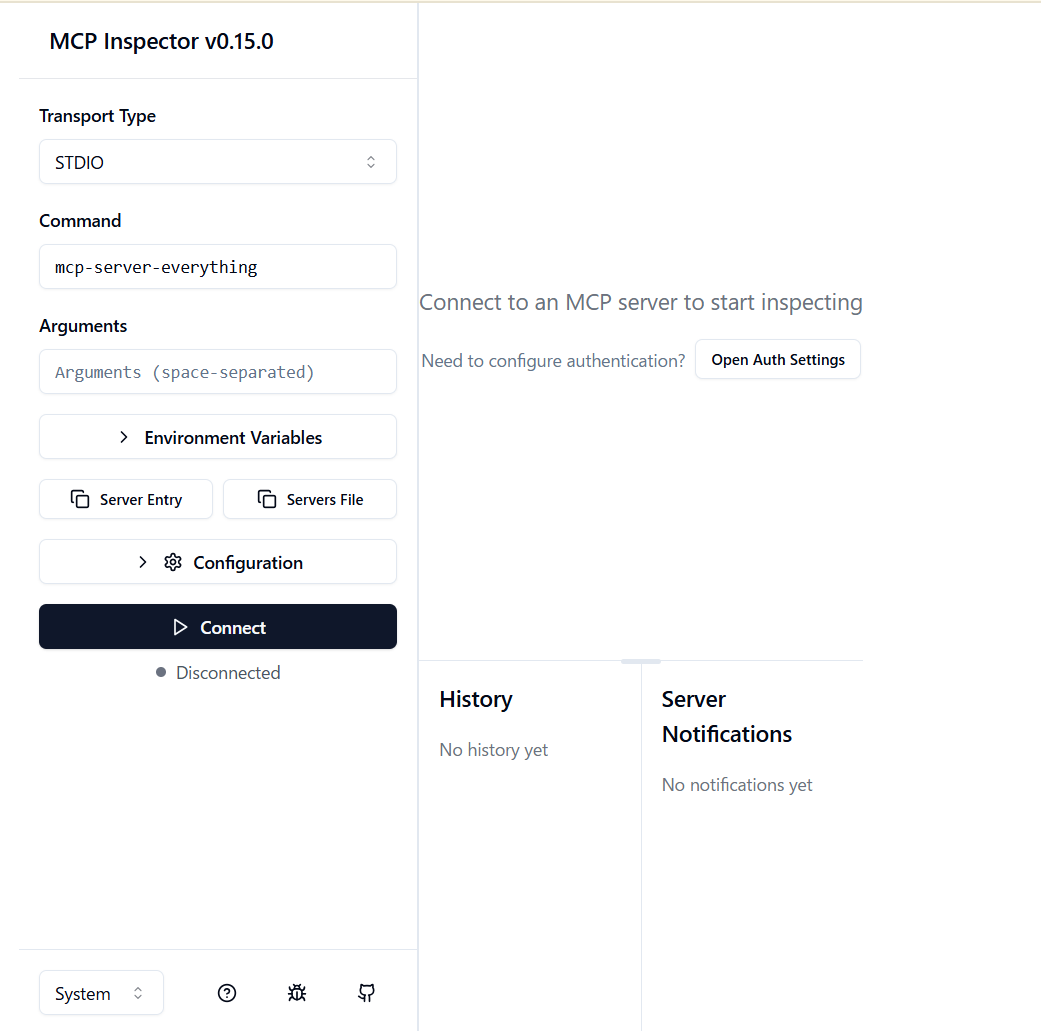
無事アクセスができています。
テスト
ではテストを行います。
Transport Type = Stremable HTTP
URL = http://localhost:3000/mcp
でConnectをクリックします。
接続が行われInitializeが完了していることがわかります。

toolsタブからList toolsをクリックすると以下の様にMCP Serverからレスポンスが戻ってきていることがわかります。
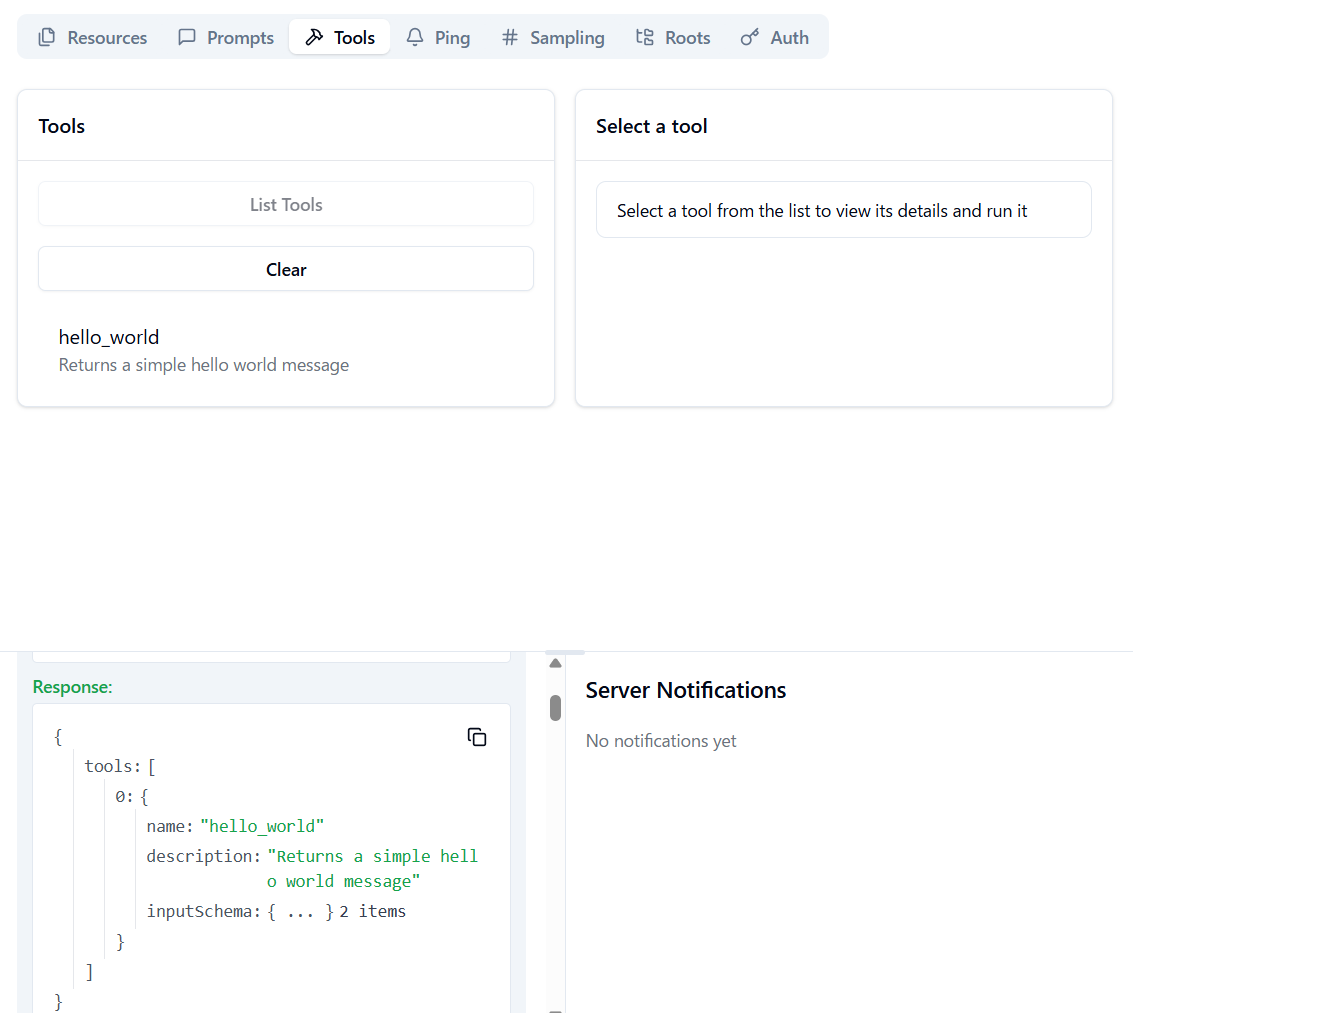
表示されたツール(この例でいえばhello_world)をクリックすると会話が可能になります。
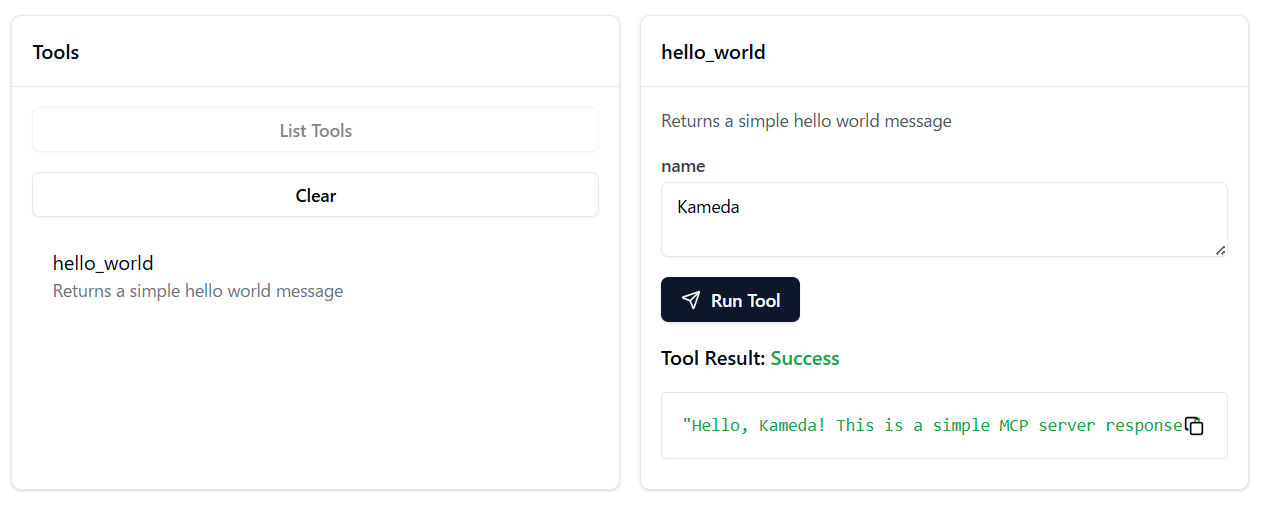
注意点:
本来いつMCP Serverを呼び出すのかはMCP Clientが判断するため完全なる制御は行えないのでMCPの実装上の課題です。これはPostmanを用いたテストも同様ですが、MCP Inspectorを用いたテストはMCP Serverとの通信専用なので、通常のLLMがMCP Serverを呼び出す部分は存在していません。
このため、通常のLLMとMCP Serverの接続性や会話の流れの自然さなどは、やはり最終的なLLM用MCP Clientツールを用いる必要があります。